These days I got this exception message: “The transaction operation cannot be performed because there are pending requests working on this transaction.” This is how I fixed it after almost a whole day of Googling and debugging.
To fix the “pending requests” exception, make sure to properly await all asynchronous methods wrapped inside any database transaction.
The reservation process used two types of steps inside a pipeline: foreground and background steps.
The foreground steps ran to separate enough rooms for the reservation. And the background steps did everything else to fulfill the reservation but in background jobs.
If anything wrong happened while executing the foreground steps, the whole operation rollbacked. And there were no rooms set aside for the incoming reservation. To achieve this, every foreground step had a method to revert its own operation.
The code to revert the whole pipeline was wrapped inside a transaction. It looked something like this,
The Commit() method broke with the exception mentioned earlier. Arrrggg!
No displays or electronic devices were damaged while debugging this issue. Photo by Julia Joppien on Unsplash
Always await async methods
After Googling for a while, I found a couple of StackOverflow answers that mention to await all asynchronous methods. But, I thought it was a silly mistake and I started to look for something else more complicated.
After checking for a while, trying to isolate the problem, following one of my debugging tips, something like this code got all my attention.
Did you notice any asynchronous methods not being awaited? No? I didn’t for a while. Neither did my reviewers.
But, there it was. Unnoticed for the code analyzer too. And, for all the passing tests.
Oh, dear! var updatedByUserId = GetSystemUserAsync(context).Id. This line was the root of the issue. It was meant to log the user Id who performed an operation, not the Id of the Task not being awaited.
Voilà! In case you have to face this exception, take a deep breath and carefully look for any async methods not being awaited inside your transactions.
If you want to read more content, check my debugging tips. To learn to write unit tests, start reading Unit Testing 101. A better failing test would’ve caught this issue.
To read about C# async/await keywords, check my C# Definitive Guide. It contains good resources to be a fluent developer in C#.
Another Monday Links. Five articles I found interesting in last month.
Don’t waste time on heroic death marches
“Successful companies, whether they’re programming houses, retailers, law firms, whatever, make their employees’ needs a priority.” Totally agree. No more comments! Read full article
How to study effectively
One of my favorite subjects: how to study. Don’t cram. Don’t reread the material. Don’t highlight. Instead, study in short sessions and recall the material. Easy! There are even more strategies. Read full article
Undervalued Software Engineering Skills: Writing Well
We, as developers, spend a lot of time writing prose, not only code. Commit messages, ticket and PR descriptions, README files. We should get better at it. To check my writings, I use the Hemingway app often. Read full article
15 signs you joined the wrong company as a developer
Number 12. and 13. are BIG red flags. Let’s pay attention to those. Recently, I read about “disagree with your feet.” It resonates with this article. When you don’t like something about your job and you can’t do anything about it, walk away. Read full article
No, we won’t have a video call for that
I don’t like those chat messages with only “Hi!” or “How are you?” when we both know that’s not the message. This article shows how to better communicate on remote teams. Embrace asynchronous communication. Prefer (in order) Issue tracker, Wiki, email, and chat. Stay away from video calls as much as possible. Don’t ping people on chat software. And other ideas. Read full article, Watch full presentation.
Voilà! This Monday Links ended up being about better workplaces. See you in a month or two in the next Monday Links! In the meantime, grab your own copy of my free eBook Unit Testing 101. Don’t miss the previous Monday Links on Farmers, Incidents and Holmes.
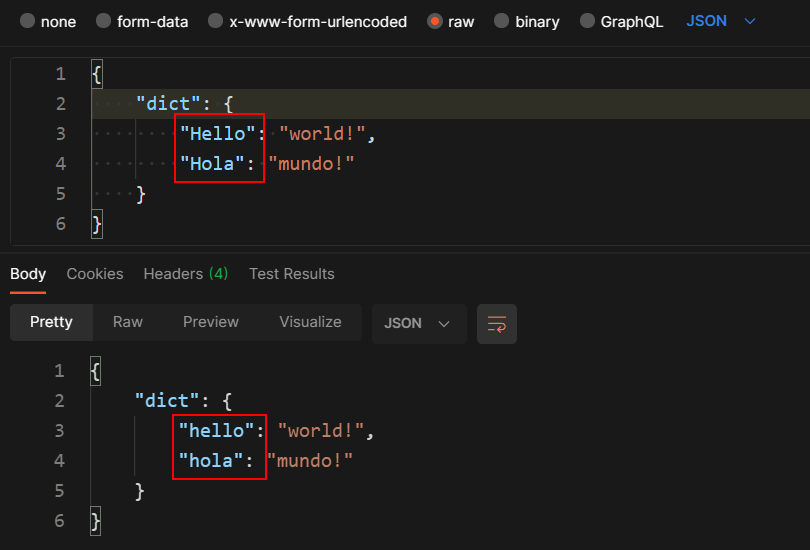
Today, I needed to pass a dictionary between two ASP.NET Core 6.0 API sites. To my surprise, on the receiving side, I got the dictionary with all its keys converted to lowercase instead of PascalCase. I couldn’t find any element on the dictionary, even though the keys had the same names on each API site. This is what I learned about serializing dictionary keys.
Serialization with Newtonsoft.Json
It turns out that the two API sites were using Newtonsoft.Json for serialization. Both of them used the CamelCasePropertyNamesContractResolver when adding Newtonsoft.Json.
Something like this,
usingNewtonsoft.Json.Serialization;usingNewtonsoft.Json;varbuilder=WebApplication.CreateBuilder(args);builder.Services.AddControllers().AddNewtonsoftJson(options=>// ^^^^^{options.SerializerSettings.NullValueHandling=NullValueHandling.Ignore;options.SerializerSettings.ContractResolver=newCamelCasePropertyNamesContractResolver();// ^^^^^// This is what I mean});varapp=builder.Build();app.MapControllers();app.Run();
With CamelCasePropertyNamesContractResolver, Newtonsoft.Json writes property names in camelCase. But, Newtonsoft.Json treats dictionary keys like properties too.
That was the reason why I got my dictionary keys in lowercase. I used one-word names and Newtonsoft.Json made them camelCase.
To prove this, let’s create a simple controller that read and writes a dictionary. Let’s do this,
usingMicrosoft.AspNetCore.Mvc;namespaceLowerCaseDictionaryKeys.Controllers;[ApiController][Route("[controller]")]publicclassDictionaryController:ControllerBase{[HttpPost]publicMyViewModelPost(MyViewModelinput){returninput;// ^^^^^// Just return the same input}}publicclassMyViewModel{publicIDictionary<string,string>Dict{get;set;}}
Now, let’s notice in the output from Postman how the request and the response differ. The keys have a different case. Arggg!
Postman request and response bodies
1. Configure Newtonsoft.Json naming strategy
To preserve the case of dictionary keys with Newtonsoft.Json, configure the ContractResolver setting with CamelCaseNamingStrategy class and set its ProcessDictionaryKeys property to false.
When registering Newtonsoft.Json, in the SerializerSettings option, let’s do:
usingNewtonsoft.Json.Serialization;usingNewtonsoft.Json;varbuilder=WebApplication.CreateBuilder(args);builder.Services.AddControllers().AddNewtonsoftJson(options=>// ^^^^^{options.SerializerSettings.NullValueHandling=NullValueHandling.Ignore;options.SerializerSettings.ContractResolver=newCamelCasePropertyNamesContractResolver{NamingStrategy=newCamelCaseNamingStrategy{ProcessDictionaryKeys=false// ^^^^^// Do not change dictionary keys casing}};});varapp=builder.Build();app.MapControllers();app.Run();
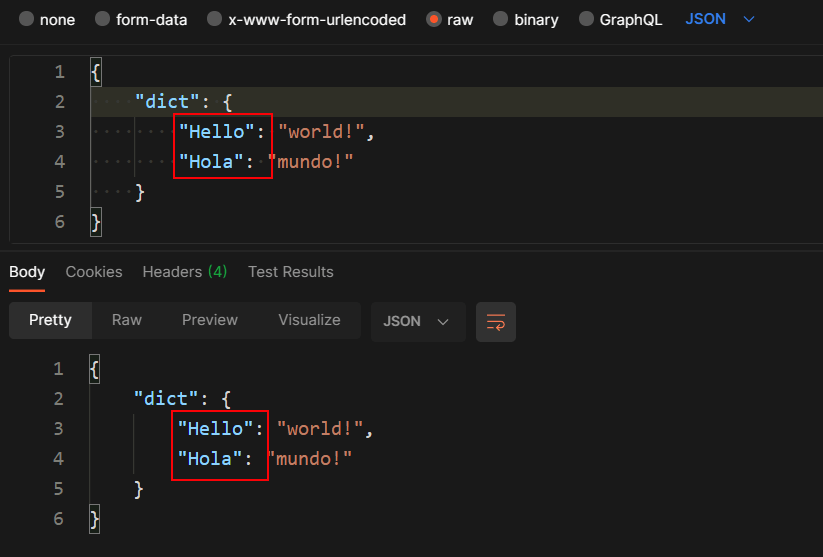
After changing the naming strategy, let’s see the response of our sample controller. That’s what I wanted!
Postman request and response bodies
What about System.Text.Json?
To maintain case of dictionary keys with System.Text.Json, let’s set the DictionaryKeyPolicy property inside the JsonSerializerOptions to JsonNamingPolicy.CamelCase.
Another alternative is to use a dictionary with a comparer that ignores case of keys.
On the receiving API site, let’s add an empty constructor on the request view model to initialize the dictionary with a comparer to ignore cases.
In my case, I was passing a metadata dictionary between the two sites. I could use a StringComparer.OrdinalIgnoreCase to create a dictionary ignoring the case of keys.
This way, no matter the case of keys, I could find them when using the TryGetValue() method.
Voilà! That’s how we can configure the case of dictionary keys when serializing requests and how to read dictionaries with keys no matter the case of its keys.
We have covered some common mistakes when writing unit tests. Some of them may seem obvious. But, we all have made this mistake when we started to write unit tests. This is the most common mistake when writing unit tests and how to fix it.
Don’t repeat the logic under test when verifying the expected result of tests. Instead, use known, hard-coded, pre-calculated values.
Let’s write some tests for Stringie, a (fictional) library to manipulate strings with a fluent interface. Stringie has a Remove() method to remove substrings from the end of a string.
When writing unit tests, don’t copy the tested logic and paste it into private methods to use them inside assertions.
If we bring the tested logic to private methods in our tests, we will have code and bugs in two places. Duplication is the root of all evil. Even, inside our tests.
Please, don’t write assertions like the one in this test.
[TestMethod]publicvoidRemove_ASubstring_RemovesThatSubstringFromTheEnd(){stringstr="Hello, world!";stringtransformed=str.Remove("world!").From(The.End);Assert.AreEqual(RemoveFromEnd(str,"world!"),transformed);// ^^^^^// We duplicate the Remove logic in another method}privatestringRemoveFromEnd(stringstr,stringsubstring){varindex=str.IndexOf(substring);returnindex>=0?str.Remove(index,substring.Length):str;}
Also, by mistake, we expose the internals of the tested logic to use them in assertions. We make private methods public and static. Even to test those private methods directly.
From our Unit Testing 101, we learned to write unit tests through public methods. We should test the observable behavior of our tested code. A returned value, a thrown exception, or an external invocation.
Again, don’t write assertions like the one in this test.
[TestMethod]publicvoidRemove_ASubstring_RemovesThatSubstringFromTheEnd(){stringstr="Hello, world!";stringtransformed=str.Remove("world!").From(The.End);Assert.AreEqual(Stringie.PrivateMethodMadePublicAndStatic(str),transformed);// ^^^^^// An "internal" method exposed to our tests }
Use known values to Assert
Instead of duplicating the tested logic, by exposing internals or copy-pasting code into assertions, use a known expected value.
For our sample test, let’s simply use the expected substring "Hello,". Like this,
[TestMethod]publicvoidRemove_ASubstring_RemovesThatSubstringFromTheEnd(){stringstr="Hello, world!";stringtransformed=str.Remove("world!").From(The.End);Assert.AreEqual("Hello,",transformed);// ^^^^^^^^// Let's use a known value in our assertions}
If we end up using the same expected values, we can create constants for them. Like,
Voilà! That’s the most common mistake when writing unit tests. It seems silly! But often, we duplicate Math operations and string concatenations and it passes unnoticed. Remember, don’t put too much logic in your tests. Tests should be only assignments and method calls.
Want to write readable and maintainable unit tests in C#? Join my course Mastering C# Unit Testing with Real-world Examples on Udemy and learn unit testing best practices while refactoring real unit tests from my past projects. No more tests for a Calculator class.
In this part of the C# idioms series, we have one idiom to write more intention-revealing defaults and another idiom to convert mapping code using a switch to a more compact alternative using a dictionary.
Use intention-revealing defaults
When initializing variables to default values, use intention-revealing alternatives.
Are you initializing a string variable to later assign it? Use "". Do you want to return an empty string from a method? Use string.Empty.
The same is true for collections. If you’re initializing a collection to later add some elements, use the normal constructors like new string[length]; or new List<string>();.
But, if you want to return an empty collection. Use Array.Empty<string>() or Enumerable.Empty<string>().
Replace switch with a dictionary
Replace switch mapping two types with a dictionary.
Turn every value in the case statements into a key in the dictionary. And, turn the returned value in every case into the value of the matching key in the dictionary.
To replace the default case, take advantage of the TryGetValue() or GetValueOrDefault() methods.
Before, to map from a credit card brand name in strings to a CardType enum, we did this,