In 2023, I realized that I’ve been blogging for five years. I started this blog to keep some notes online. Since then, I’ve used my blog to share my learned lessons, answer questions, and rant out loud. I consider my blog as my time capsule.
Last year, I wrote 23 posts. I tried to write one post every other week.
Too many layers: My take on Queries and Layers. While working with one of my clients, I had to write a lot of response objects and mapping methods to implement read-only API endpoints. This post contains my thoughts on taking layering to the extreme.
Last year, I continued working as an independent contractor and content writer. I continued writing for NCache official blog. I started offering onsite courses and training in my city. Unfortunately, I saw a lot of coworkers being laid off. I hope they all had found “greener pastures.”
Voilà! That’s my 2023 in review and your five favorite posts. I hope you enjoyed them as much as I did writing them.
These days, I spent a while debugging an issue. After a couple of minutes of scratching my head, I realized I was looking at log entries in the wrong environment. I know! A facepalm moment. I decided to look for a way to change the colors of a browser tab or a website based on the URL I visited. This is what I found.
Coloring a website per URL
After a quick search, I found the URLColors extension in GitHub. It adds an opaque rectangle on top of a website. We only need to configure a keyword for the URL and a hex color. Optionally, it can make the rectangle blink.
I used this extension to color the OpenSearch dashboard and other websites I work with. I use the Solarized theme and different color temperatures and rectangle width per environment.
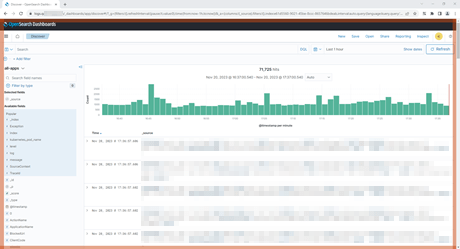
This is what an OpenSearch dashboard looks like,
An OpenSearch dashboard for a non-development environment
I go with a red and thick rectangle that blinks for Production-related environments.
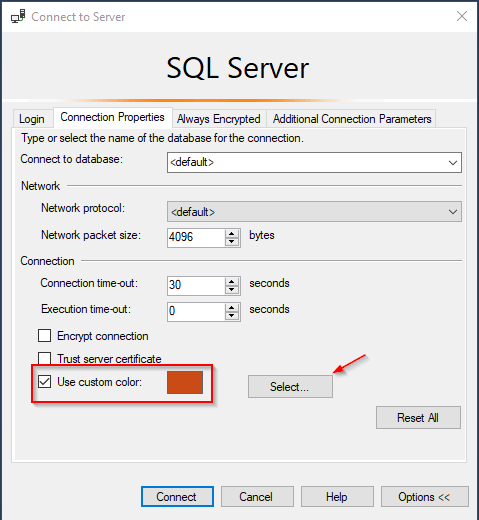
Coloring Management Studio bar per connection string
I use a similar trick with SQL Server Management Studio. When connecting to a new server, under the “Options” button, we can change the color of the status bar,
SQL Server Management Studio 'Use custom color' option
Voilà! No more changes in the Production environment by mistake. No more time wasted looking at the wrong website. Colors are helpful for that.
These days while procastinating on HackerNews, I found this submission. It points to a GitHub repo with some uBlock Origin filters to clean up websites.
I learned that I not only can block elements in a page with uBlock Origin, but also restyle them. Ding, ding, ding! These are the uBlock Origin filters I’m using to declutter some site I visit often.
1. uBlock Origin filters to restyle elements
A uBlock Origin filter to restyle an element looks like this,
<domain>##<selector>:style(<new-css-here>)
Here are the filters I used to restyle HackYourNews and HackerNews,
Voilà! That’s how to use uBlock Origin filters to declutter websites. I like clean and minimalistic designs. Before learning about uBlock Origin filters, I started to dabble into browser extension development to restyle sites. With these filters, it’s easier.
What site would you like to declutter with this trick?
Back in the day, for my Advent of Posts I shared some lessons on Hangfire and OrmLite. In this year, for one of my client’s project I’ve been working with OrmLite a lot. Let me expand on those initial lessons and share some others.
1. IgnoreOnUpdate attribute
When using SaveAsync() or any update method, OrmLite omits properties marked with the [IgnoreOnUpdate] attribute in the generated SQL statement. Source
Also OrmLite has similar attributes for insertions and queries: [IgnoreOnInsertAttribute] and [IgnoreOnSelectAttribute].
2. QueryFirst vs SqlScalar
OrmLite QueryFirst() method requires an explicit transaction as a parameter. Source Unlike QueryFirst(), SqlScalar() uses the same transaction from the input database connection. Source
I learned this because I had a DoesIndexExist() method inside a database migration and it failed with the message “ExecuteReader requires the command to have a transaction…“
This is what I had to change,
privatestaticboolDoesIndexExist<T>(IDbConnectionconnection,stringtableName,stringindexName){vardoesIndexExistSql=@$"
SELECTCASEWHENEXISTS(SELECT*FROMsys.indexesWHEREname='{indexName}'ANDobject_id=OBJECT_ID('{tableName}'))THEN1ELSE0END";
// Before//// return connection.QueryFirst<bool>(isIndexExistsSql);// ^^^^^// Exception: ExecuteReader requires the command to have a transaction...// Aftervarresult=connection.SqlScalar<int>(doesIndexExistSql);// ^^^^^returnresult>0;}
3. Create Indexes
Apart from reading and writing records, OrmLite can modify the database schema, for example to create tables and indexes.
To create an index for a table, we could either annotate fields or classes. For example,
By default, CreateIndex() creates indexes with names like: idx_TableName_FieldName. Source We can omit the index name if we’re fine with this naming convention.
4. Tag queries to easy troubleshooting
To identify the source of queries, OrmLite has two methods: TagWith() and TagWithCallSite().
For example,
varmovies=_connection.From<Movie>()// Some filters here....Take(10).TagWith("AnAwesomeQuery")// Or//.TagWithCallSite();
With TagWith(), OrmLite includes a comment at the top of the generated SQL query with the identifier we pass.
For the previous tagged query, this is the generated SQL statement,
With TagWithCallSite(), Ormlite uses the path and line number of the file that made that database call instead.
This is a similar trick to the one we use to debug dynamic SQL queries. It helps up to traceback queries once we found them in our database plan cache.
5. LoadSelectAsync and unparameterized queries
OrmLite has two convenient methods: LoadSelect() and LoadSelectAsync(). They find some records and load their child references.
varquery=_connection.From<Movie>()// Some filters here.Take(10);varmovies=await_connection.LoadSelectAsync(query);// ^^^^^// It loads movies and their child directors
When using LoadSelect() and LoadSelectAsync(), OrmLite doesn’t parameterize the internal query used to load the child entities. Arrrggg!
I’m not sure if it’s a bug or a feature. But, to load child entities, OrmLite “inlines” the parameters used to run the parent query. We will see in the plan cache of our database lots of unparameterized queries.
See it by yourself in OrmLite source code, here and here.
After finding out about this behavior, I ended up ditching LoadSelectAsync() and using SelectAsync() instead, like this,
varmoviesQuery=_connection.From<Movie>()// Some filters here.Take(10);varmovies=await_connection.SelectAsync(moivesQuery);if(!movies.Any()){returnEnumerable.Empty<Movie>();}vardirectorsQuery=_connection.From<Director>().Where(d=>Sql.In(d.MovieId,moviesQuery.Select<Movie>(d=>d.Id)));vardirectors=await_connection.SelectAsync(directorsQuery);foreach(varminmovies){m.Director=directors.Where(r=>r.MovieId==m.Id);}
Probably there’s a better solution, but that was my workaround to avoid a flooded plan cache. I could afford an extra roundtrip to the database and I didn’t want to write SQL queries by hand. C’mon!
Voilà! These are some of the lessons I’ve learned while working with OrmLite. Again, things we only find out when we adventure to read our libraries source code.
Another day working with OrmLite. This time, I needed to support a report page with a list of dynamic filters and sorting fields. Instead of writing a plain SQL query, I needed to write a SqlExpression that joins to a subquery. OrmLite doesn’t support that. This is what I learned (or hacked) today.
Let’s imagine we need to write an SQL query for a report to show all directors based on filters like name, birthdate, and other conditions. Next to each director, we need to show their movie count and other counts. For me, it was reservations and rooms. But the idea is still the same.
1. Using a SQL query with a CTE
Since we needed to support filters based on the user’s input, the best solution would be to write a dynamic SQL query. I know, I know! That’s tedious.
If we have the Director and Movie tables, we could write a query like this,
WITHMovieCountAS(SELECTDirectorId,COUNT(*)Count/* More aggregations here */FROMMovie/* Some filters here */GROUPBYDirectorId)SELECTd.*,m.CountFROMDirectordLEFTJOINMovieCountmONd.Id=m.DirectorIdWHEREd.Country='USA'/* More filters here *//* Sorting by other filters here */ORDERBYm.CountDESC
While trying to translate that query to OrmLite expressions, I realized OrmLite doesn’t support joining to subqueries. Arrrggg!
I rolled up my sleeves and started to take a deeper look.
I ended up hacking this,
usingServiceStack.DataAnnotations;usingServiceStack.OrmLite;namespaceJoiningToSubqueries;publicclassJoinTetsts{[Fact]publicasyncTaskItWorksItWorks(){varconnectionString="...Any SQL Server connection string here...";vardbFactory=newOrmLiteConnectionFactory(connectionString);usingvardb=dbFactory.Open();// 0. Create Movie and Director tablesdb.CreateTable<Director>();db.CreateTable<Movie>();// 1. Populate some datavarjamesCameron=newDirector{FullName="James Cameron",Country="Canada",Movies=newList<Movie>{newMovie{Name="Titanic"}}};awaitdb.SaveAsync(jamesCameron,references:true);varstevenSpielberg=newDirector{FullName="Steven Spielberg",Country="USA",Movies=newList<Movie>{newMovie{Name="Raiders of the Lost Ark"},newMovie{Name="Jurassic Park",}}};awaitdb.SaveAsync(stevenSpielberg,references:true);vargeorgeLucas=newDirector{FullName="George Lucas",Country="USA",Movies=newList<Movie>{newMovie{Name="Star Wars: A New Hope"}}};awaitdb.SaveAsync(georgeLucas,references:true);// 2. Write a subquery to do the countingvarmovieCountPerDirector=db.From<Movie>()// We could add some filters here....GroupBy(x=>x.DirectorId).Select(x=>new{x.DirectorId,Count=Sql.Custom("COUNT(*)")});// 2. Write the parent query to filter and sortvarquery=db.From<Director>().LeftJoin(movieCountPerDirector,(d,m)=>d.Id==m.DirectorId,subQueryAlias:"mc")// ^^^^^// It receives a subquery, join expression// and alias//// We could add some filters here....Where(d=>d.Country=="USA").Select(d=>new{d,MovieCount=Sql.Custom("mc.Count")// ^^^^// Same alias as subQueryAlias parameter})// We could change the sorting column here too....OrderBy(Sql.Desc("mc.Count"));vardirectors=awaitdb.SelectAsync<DirectorAndMovieCount>(query);Assert.Equal(2,directors.Count);Assert.Contains(directors,d=>d.FullName=="Steven Spielberg");Assert.Contains(directors,d=>d.FullName=="George Lucas");}}publicclassDirectorAndMovieCount{publicintId{get;set;}publicstringFullName{get;set;}publicstringCountry{get;set;}publicintMovieCount{get;set;}}
After creating the two tables and adding some movies, we wrote the aggregation part inside the CTE with a normal SqlExpression. That’s the movieCountPerDirector variable.
Then, we needed the JOIN between movieCountPerDirector and the parent query to apply all the filters and sorting. We wrote,
We wrote a LeftJoin() that received a subquery, a joining expression, and an alias.
We might use aliases on the tables to avoid name clashes on the JOIN expression.
3. LeftJoin with another SqlExpression
And this is the LeftJoin() method,
publicstaticpartialclassSqlExpressionExtensions{publicstaticSqlExpression<T>LeftJoin<T,TSubquery>(thisSqlExpression<T>expression,SqlExpression<TSubquery>subquery,Expression<Func<T,TSubquery,bool>>joinExpr,stringsubqueryAlias){// This is to "move" parameters from the subquery// to the parent query while keeping the right// parameter count and order.// Otherwise, we could have a parameter named '@0'// on the parent and subquery that refer to// different columns and values.varsubqueryParams=subquery.Params.Select(t=>t.Value!).ToArray();varsubquerySql=FormatFilter(expression,subquery.ToSelectStatement(),filterParams:subqueryParams);// This is a hacky way of replacing the original// table name from the join condition with the// subquery alias// From:// "table1"."Id" = "table2"."Table1Id"// To:// "table1"."Id" = "mySubqueryAlias"."Table1Id"varoriginalCondition=expression.Visit(joinExpr).ToString();vardefinition=ModelDefinition<TSubquery>.Definition;varaliasCondition=definition.Alias==null?originalCondition:originalCondition!.Replace(definition.Alias,subqueryAlias);// For example,// LEFT JOIN (SELECT Column1 FROM ...) cte ON parent.Id = cte.parentIdexpression=expression.CustomJoin<TSubquery>($"LEFT JOIN ({subquerySql}) {subqueryAlias} ON {aliasCondition}");returnexpression;}privatestaticstringFormatFilter<T>(SqlExpression<T>query,stringsqlFilter,paramsobject[]filterParams){if(string.IsNullOrEmpty(sqlFilter)){returnstring.Empty;}for(vari=0;i<filterParams.Length;i++){varpLiteral="{"+i+"}";varfilterParam=filterParams[i];if(filterParamisSqlInValuessqlParams){if(sqlParams.Count>0){varsqlIn=CreateInParamSql(query,sqlParams.GetValues());sqlFilter=sqlFilter.Replace(pLiteral,sqlIn);}else{sqlFilter=sqlFilter.Replace(pLiteral,SqlInValues.EmptyIn);}}else{varp=query.AddParam(filterParam);sqlFilter=sqlFilter.Replace(pLiteral,p.ParameterName);}}returnsqlFilter;}privatestaticstringCreateInParamSql<T>(SqlExpression<T>query,IEnumerablevalues){varsbParams=StringBuilderCache.Allocate();foreach(variteminvalues){varp=query.AddParam(item);if(sbParams.Length>0)sbParams.Append(",");sbParams.Append(p.ParameterName);}varsqlIn=StringBuilderCache.ReturnAndFree(sbParams);returnsqlIn;}}
Let’s go through it!
It starts by copying the parameters from the subquery into the parent query. Otherwise, we could end up with parameters with the same name that refer to different values.
OrmLite names parameters using numbers, like @0. On the subquery, @0 could refer to another column as the @0 on the parent query.
Then, it converts the joining expression into a SQL string. We used the Visit() method for that. Then, if the subquery has an alias, it replaces the table name with that alias on the generated SQL fragment for the join expression. And it builds the final raw SQL and calls CustomJoin().
I brought the FormatFilter() and CreateInParamSql() methods from OrmLite source code. They’re private on the OrmLite source code.
Voilà! That is what I learned (or hacked) today. Again, things we learn when we read the source code of our libraries. We used the Visit(), CustomJoin(), and two helper methods we brought from the OrmLite source code to make this work.
We only used LEFT JOIN, but we can extend this idea to support INNER JOIN.
As an alternative to this hacky solution, we could write a dynamic SQL query. Next idea! Or we could create an indexed view to replace that counting subquery with a normal join. We could roll a custom method JoinToView() to append a WITH NO_EXPAND to the actual JOIN. I know everybody can’t afford a SQL Server Enterprise edition.