Software projects don’t fail because of the tech stack, programming languages, or frameworks.
Sure, choosing the right tech stack is critical for the success of a software project. But software projects fail due to unclear expectations and communication issues. Even unclear expectations are a communication issue too.
This is a failed software project that was killed by unclear expectations and poor communication.
This was a one-month project to integrate a Property Management System (PMS) with a third-party Guest Messaging System. The idea was to sync reservations and guest data to this third-party system, so hotels could send their guests reminders and Welcome messages.
Even though our team delivered the project, we made some mistakes and I learned a lesson or two.
1. Minimize Moving Parts
Before starting the project, we worked with an N-tier architecture. Controllers call Services that use Repositories to talk to a database. There’s nothing wrong with that.
But, the new guideline was to “start doing DDD.” That’s not a bad thing per se. The thing was: almost nobody in the team was familiar with DDD.
I had worked with some of the DDD artifacts before. But, we didn’t know what the upper management wanted with “start doing DDD.”
With this decision, a one-month project ended up being behind schedule.
After reading posts and sneaking into GitHub template projects, two or three weeks later, we agreed on the project structure, aggregate and entity names, and an overall approach. We were already late.
For such a small project with a tight schedule, there was no room for experimentation.
“The best tool for a job is the tool you already know.” At that time, the best tool for my team was N-tier architecture.
For my future projects, I will minimize the moving parts.
2. Define a Clear Path
We agreed on reading the “guests” and “reservations” tables inside a background processor to call the third-party APIs. And we stared working on it.
But another team member was analyzing how to implement an Event-Driven solution with a message queue.
Our team member didn’t realize that his solution required “touching” some parts of the Reservation lifecycle, with all the Development and Testing effort implied.
Although his idea could be the right solution, in theory, we already chose the low-risk solution. He wasted some time we could have used on something else.
For my future projects, I will define a clear path and have everybody on-boarded.
3. Don’t Get Distracted. Cross the Finish Line
With a defined solution and everybody working on it, the team lead decided to put the project back on track with more meetings and ceremonies.
We started to estimate with poker planning.
During some of the planning sessions, we joked about putting “in one month” as the completion date for all tickets and stopped doing those meetings.
Why should everyone in the team vote for an estimation on a task somebody else was already working on? We all knew what we needed and what everybody else was doing.
It was time to focus on the goal and not get distracted by unproductive ceremonies or meetings. I don’t mean stop writing unit tests or doing code reviews. Those were the minimum safety procedures for the team.
For my future projects, I will focus on crossing the finish line.
Voilà! These are the postmortem lessons I learned from this project. Although tech choice plays a role in the success of a project, I found that “people and interactions” are way more important than choosing the right libraries and frameworks.
I bet we can find fail projects using the most state-of-the-art technology or programming languages.
Like marriages, software projects fail because of unclear expectations and poor communication. This was one of them.
LINQ is the perfect way to work with collections. It’s declarative and immutable. But, from time to time, I take some extension methods with me to the projects I work with. These are some extension methods to work with collections.
1. Check if a collection is null or empty
These are three methods to check if a collection is null or empty. They’re wrappers around the LINQ Any method.
Notice we used the [NotNullWhen] attribute to let the compiler know if the source collection is null. This way, when we turn on the nullable references feature, the compiler can generate more accurate warnings. If we don’t add this attribute, we get some false positives. Like this one,
IEnumerable<Movie>?movies=null;if(movies.IsNotNullOrEmpty()){movies.First();// ^^^^^// CS8604: Possible null reference argument for parameter 'source'//// But we don't want this warning here...}
2. EmptyIfNull
In the same spirit of DefaultIfEmpty, let’s create a method to return an empty collection if the source collection is null. This way, we can “go with the flow” by nesting this new method with other LINQ methods.
.NET 9 introduced the Index method that works like our Enumerated(). We don’t need to roll our own method anymore in recent versions of .NET.
Voilà! These are some of my favorite extension methods to work with collections. Some of them are workarounds to avoid the NullReferenceException when working with collections. What extension methods do you use often?
Want to write more expressive code for collections? Join my course, Getting Started with LINQ on Udemy and learn everything you need to know to start working productively with LINQ—in less than 2 hours.
That post reminded me I have my own script to create the folder structure for ASP.NET Core API projects. Currently, I work with a client where I have to engage in short (3-5 month) projects. Every now and then, I create new projects. And these are the types of tasks we don’t do often and always forget how to do it. Why not scripting it!
How to create project structure with dotnet cli
This is the script I use to create the source and test projects with the references between them for an ASP.NET Core API project:
# Change to suit your own needsPrefix=Acme.CoolProject
# ^^^^^# Change it to use your project name prefix# 1. Create solution
dotnet new sln --name$Prefix.Api
# 2. Create src projects# Create class librariesfor name in'Data''Domain''Infrastructure''Messages'do# Optionally:# dotnet new classlib -o $Prefix.$name/src -n $name
dotnet new classlib -o src/$Prefix.$name
dotnet sln add src/$Prefix.$name/$Prefix.$name.csproj --in-rootdone# Create Console projects
dotnet new console -o src/$Prefix.Data.Migrator
dotnet sln add src/$Prefix.Data.Migrator/$Prefix.Data.Migrator.csproj --in-root# Create Api projects
dotnet new webapi -o src/$Prefix.Api
dotnet sln add src/$Prefix.Api/$Prefix.Api.csproj --in-root# Api depends on Data, Infrastructure, and Messagesfor dependsOn in'Data''Infrastructure''Messages'do
dotnet add src/$Prefix.Api/$Prefix.Api.csproj reference src/$Prefix.$dependsOn/$Prefix.$dependsOn.csproj
done# Data depends on Domain and Infrastructurefor dependsOn in'Domain''Infrastructure'do
dotnet add src/$Prefix.Data/$Prefix.Data.csproj reference src/$Prefix.$dependsOn/$Prefix.$dependsOn.csproj
done# Data.Migrator depends on Data
dotnet add src/$Prefix.Data.Migrator/$Prefix.Data.Migrator.csproj reference src/$Prefix.Data/$Prefix.Data.csproj
# Infrastructure depends on Domain and Messagesfor dependsOn in'Domain''Messages'do
dotnet add src/$Prefix.Infrastructure/$Prefix.Infrastructure.csproj reference src/$Prefix.$dependsOn/$Prefix.$dependsOn.csproj
done# 3. Create test projectsfor name in'Api''Data''Domain''Infrastructure'do
dotnet new mstest -o tests/$Prefix.$name.Tests
dotnet sln add tests/$Prefix.$name.Tests/$Prefix.$name.Tests.csproj -s Tests
dotnet add tests/$Prefix.$name.Tests/$Prefix.$name.Tests.csproj reference src/$Prefix.$name/$Prefix.$name.csproj
done# 4. Copy template files# .gitignore, .editorconfig, .dockerignore# Copy dotfilesfor file in$(ls-I"*.cs" ~/Documents/_Projects/_FolderStructure/Templates/)do
cp ~/Documents/_Projects/_FolderStructure/Templates/$file.done# 5. Cleanup
find .-name"WeatherForecastController.cs"-type f -delete
find .-name"WeatherForecast.cs"-type f -delete
find .-name"Class1.cs"-type f -delete
find .-name"UnitTest1.cs"-type f -delete
When I need to create a new project, I only change the Prefix at the top of the file.
Notice this script copies some template files (.gitignore, .editorconfig, .dockerignore) from a shared location.
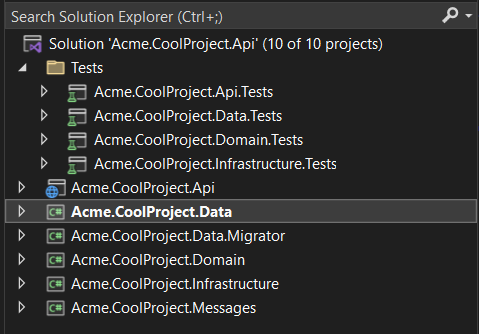
This script creates a project structure like this:
ASP.NET Core Api project structure inside Visual Studio
Even we can create folders and csproj files with shorter names by passing the -n flag and a name in the dotnet new command.
How to update the csproj files with Powershell
Then to update csproj files, like making nullable warning errors or adding a root namespace, instead of doing it by hand, I tweak this PowerShell file:
$projects=Get-ChildItem-Filter*.csproj-Recurse-Exclude*Tests*.csproj$projects|foreach{try{$path=$_.FullName;$proj=[xml](Get-Content$path);$propertyGroup=$proj.Project.PropertyGroup|where{-not[String]::IsNullOrWhiteSpace($_.TargetFramework)};$shouldSave=$falseif($propertyGroup.RootNamespace-eq$null){$RootNamespace=$propertyGroup.ParentNode.ParentNode.CreateElement('RootNamespace');$propertyGroup.AppendChild($RootNamespace)|out-null;$propertyGroup.RootNamespace="Acme.CoolProject";$shouldSave=$true}if($shouldSave){$proj.Save($path);Write-Host"RootNamespace added to $path"}}catch{Write-Host$path([System.Environment]::NewLine)$_}}
Voilà! That’s how I create the folder and project structure for one of my clients. This is another script that saved my day! Kudos to Humble Toolsmith for inspiring me to write this one.
These days I had to review some code that had one method to merge dictionaries. This is one of the suggestions I gave during that review to write good unit tests.
To write good unit tests, write the Arrange part of tests using the simplest test values that exercise the scenario under test. Avoid building large object graphs and using magic numbers in the Arrange part of tests.
Here are the tests I reviewed
These are two of the unit tests I reviewed. They test the Merge() method.
Yes, those are the real tests I had to review. I slightly changed the namespaces and the test names.
What’s wrong?
Let’s take a closer look at the first test. Do we need six dictionaries to test the Merge() method? No! And do we need 19 items? No! We can still cover the same scenario with only two single-item dictionaries without duplicate keys.
And let’s write separate tests to deal with edge cases. Let’s write one test to work with null and another one with an empty dictionary. Again two dictionaries will be enough for each test.
Having too many dictionaries with too many items made us write that funny foreach with a funny multiplication inside. That’s why some of the values are multiplied by 10, and others aren’t. We don’t need that with a simpler scenario.
Unit tests should only have assignments without branching or looping logic.
Looking at the second test, we noticed it followed the same pattern as the first one. Too many items and a weird foreach with a multiplication inside.
Let’s write our tests using simple test values to prepare our scenario under test.
[TestMethod]publicvoidMerge_NoDuplicates_DoesNotMergeNullAndEmptyOnes(){varone=newDictionary<int,int>{{1,10}};vartwo=newDictionary<int,int>{{2,20}};varmerged=one.Merge(two);// ^^^^^Assert.AreEqual(2,merged.Keys.Count);Assert.IsTrue(merged.Contains(1));Assert.IsTrue(merged.Contains(2));}// One test to Merge a dictionary with an empty one// Another test to Merge a dictionary with a null one[TestMethod]publicvoidMerge_DuplicateKeys_ReturnNoDuplicates(){varduplicateKey=1;// ^^^^^varone=newDictionary<int,int>{{duplicateKey,10},{2,20}// ^^^^^};vartwo=newDictionary<int,int>{{duplicateKey,10},{3,30}// ^^^^^};varmerged=one.Merge(two);// ^^^^^Assert.AreEqual(3,merged.Keys.Count);Assert.IsTrue(merged.Contains(duplicateKey));Assert.IsTrue(merged.Contains(2));Assert.IsTrue(merged.Contains(3));}
Notice this time, we boiled down the Arrange part of the first test to only two dictionaries with one item each, without duplicates.
And for the second one, the one for duplicates, we wrote a duplicateKey variable and used it in both dictionaries as key to make the test scenario obvious. This way, after reading the test name, we don’t have to decode where the duplicate keys are.
Since we wrote simple tests, we could remove the foreach in the Assert parts and the funny multiplications.
The test for the null and empty cases are exercises left to the reader. They’re not difficult to write.
Voilà! That’s another tip to write good unit tests. Let’s strive to have tests easier to follow with simple test values. Here we used dictionaries, but we can follow this tip when writing integration tests for the database. Often to prepare our test data, we insert multiple records when only one or two are enough to prove our point.
These days I finished another internal project while working with one of my clients. I worked to connect a Property Management System with a third-party Point of Sales. I had to work with Hangfire and OrmLite. I used Hangfire to replace ASP.NET BackgroundServices. Today I want to share some of the technical things I learned along the way.
1. Hangfire lazy-loads configurations
Hangfire lazy loads configurations. We have to retrieve services from the ASP.NET Core dependencies container instead of using static alternatives.
I faced this issue after trying to run Hangfire in non-development environments without registering the Hangfire dashboard. This was the exception message I got: “JobStorage.Current property value has not been initialized.” When registering the Dashboard, Hangfire loads some of those configurations. That’s why “it worked on my machine.”
These two issues in Hangfire GitHub repo helped me to find this out: issue #1991 and issue #1967.
This was the fix I found in those two issues:
usingHangfire;usingMyCoolProjectWithHangfire.Jobs;usingMicrosoft.Extensions.Options;namespaceMyCoolProjectWithHangfire;publicstaticclassWebApplicationExtensions{publicstaticvoidConfigureRecurringJobs(thisWebApplicationapp){// Before, using the static version://// RecurringJob.AddOrUpdate<MyCoolJob>(// MyCoolJob.JobId,// x => x.DoSomethingAsync());// RecurringJob.Trigger(MyCoolJob.JobId);// After://varrecurringJobManager=app.Services.GetRequiredService<IRecurringJobManager>();// ^^^^^recurringJobManager.AddOrUpdate<MyCoolJob>(MyCoolJob.JobId,x=>x.DoSomethingAsync());recurringJobManager.Trigger(MyCoolJob.JobId);}}
2. Hangfire Dashboard in non-Local environments
By default, Hangfire only shows the Dashboard for local requests. A coworker pointed that out. It’s in plain sight in the Hangfire Dashboard documentation. Arrrggg!
To make it work in other non-local environments, we need an authorization filter. Like this,
publicclassAllowAnyoneAuthorizationFilter:IDashboardAuthorizationFilter{publicboolAuthorize(DashboardContextcontext){// Everyone is more than welcome...returntrue;}}
And we add it when registering the Dashboard into the dependencies container. Like this,
For the In-Memory Hangfire implementation, the SucceededJobs() method from the monitoring API returns jobs from most recent to oldest. There’s no need for pagination. Look at the Reverse() method in the SucceededJobs() source code.
I had to find out why an ASP.NET health check was only working the first time. It turned out that the code was paginating the successful jobs, always looking for the oldest successful jobs. Like this,
publicclassHangfireSucceededJobsHealthCheck:IHealthCheck{privateconstintCheckLastJobsCount=10;privatereadonlyTimeSpan_period;publicHangfireSucceededJobsHealthCheck(TimeSpanperiod){_period=period;}publicTask<HealthCheckResult>CheckHealthAsync(HealthCheckContextcontext,CancellationTokencancellationToken=default){varisHealthy=true;varmonitoringApi=JobStorage.Current.GetMonitoringApi();// Before:// It used pagination to bring the oldest 10 jobs//// var succeededCount = (int)monitoringApi.SucceededListCount();// var succeededJobs = monitoringApi.SucceededJobs(succeededCount - CheckLastJobsCount, CheckLastJobsCount);// ^^^^^// After:// SucceededJobs returns jobs from newest to oldest varsucceededJobs=monitoringApi.SucceededJobs(0,CheckLastJobsCount);// ^^^^^ varsuccessJobsCount=succeededJobs.Count(x=>x.Value.SucceededAt.HasValue&&x.Value.SucceededAt>DateTime.UtcNow-period);varresult=successJobsCount>0?HealthCheckResult.Healthy("Yay! We have succeeded jobs."):newHealthCheckResult(context.Registration.FailureStatus,"Nein! We don't have succeeded jobs.");returnTask.FromResult(result);}}
This is so confusing that there’s an issue on the Hangfire repo asking for clarification. Not all storage implementations return successful jobs in reverse order. Arrrggg!
4. Prevent Concurrent execution of Hangfire jobs
Hangfire has an attribute to prevent the concurrent execution of the same job: DisableConcurrentExecutionAttribute. Source.
Even we can change the resource being locked to avoid executing jobs with the same parameters. For example, we can run only one job per client simultaneously, like this,
5. OrmLite IgnoreOnUpdate, SqlScalar, and CreateIndex
OrmLite has a [IgnoreOnUpdate] attribute. I found this attribute when reading OrmLite source code. When using SaveAsync(), OrmLite omits properties marked with this attribute when generating the SQL statement. Source.
OrmLite QueryFirst() method requires an explicit transaction as a parameter. Unlike SqlScalar() which uses the same transaction from the input database connection. Source. I learned this because I had a DoesIndexExists() method inside a database migration and it failed with the message “ExecuteReader requires the command to have a transaction…“ This is what I had to change,
privatestaticboolDoesIndexExist<T>(IDbConnectionconnection,stringtableName,stringindexName){vardoesIndexExistSql=@$"
SELECTCASEWHENEXISTS(SELECT*FROMsys.indexesWHEREname='{indexName}'ANDobject_id=OBJECT_ID('{tableName}'))THEN1ELSE0END";
// Before:// return connection.QueryFirst<bool>(isIndexExistsSql);// ^^^^^// Exception: ExecuteReader requires the command to have a transaction...// After:varresult=connection.SqlScalar<int>(doesIndexExistSql);// ^^^^^returnresult>0;}
Again, by looking at OrmLite source code, the CreateIndex() method, by default, creates indexes with names like: idx_TableName_FieldName. Then we can omit the index name parameter when working with this method. Source
Voilà! That’s what I learned from this project. This gave me the idea to stop to reflect on what I learned from every project I work on. I really enjoyed figuring out the issue with the health check. It made me read the source code of the In-memory storage for Hangfire.